Tag: asp.net cms

  • Getting Started with Umbraco Courier 2.5

    Getting Started with Umbraco Courier 2.5

    I have recently been working on an Umbraco project, and have evaluated Courier in order to deploy changes from an internal test site to live.

    While Courier does the job, I am not very impressed overall. There are a mass of missing links, and next to no information on the web on how to get started. So this is my record which hopeefully will help someone (and myself the next time I have to do this).

    The only resource I could find on the web was a fairly amateur Youtube video on Courier, which wasn’t all that helpful. You can’t see whats on the screen just the back of peoples heads. It isn’t really worth watching, it just warns you that not all component types are supported. I was only looking to deploy content and media, so hopefully this warning doesn’t apply to me – it certainly worked out that way during testing.

    This is the official Umbraco Courier 2.5 link, which has a lot of incomplete documentation and missing links at the time of writing.

    So, on to my findings:

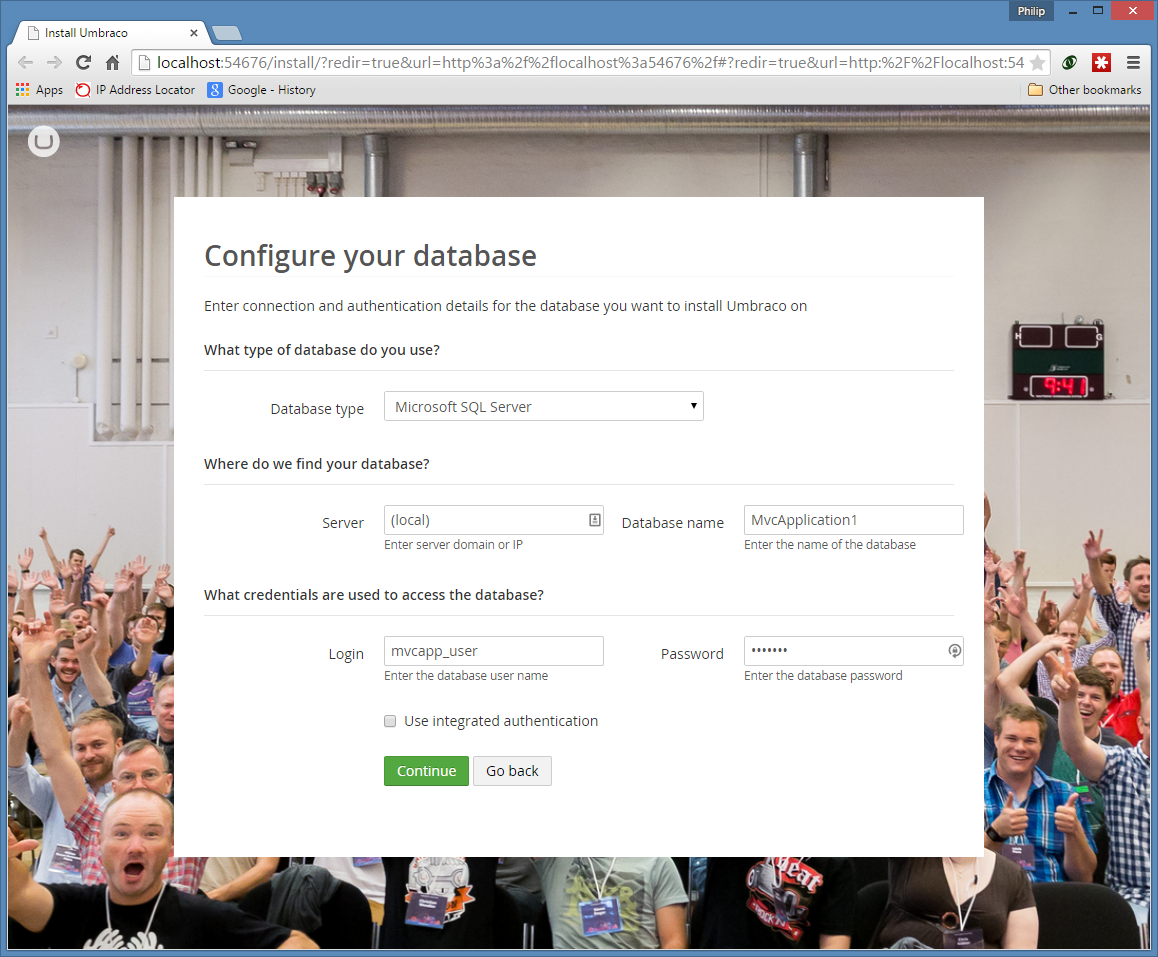
    Firstly its necessary to install Courier on both test and live. I made two test sites on my local dev machine, localhost:1600 and localhost:1601. The idea being to deploy from 1600 to 1601. I then installed the Courier package on both of these sites. When asked to specify a location during installation I specified the other site, e.g. on 1600 I typed in localhost:1601. If I didn’t do this there appears to be no way to enter it later, you have to uninstall and re-install again.

    When installed, Umbraco Courier gives you a new icon on the admin login, and also an additional option on the action menus within Umbraco. I will explain both methods below:

    Deployment from the Content Tree

    When logged on as admin, you choose the appropriate part of the tree and then click the Elipsis, then click Do Something Else.

    Select Courier from Umbraco Content Tree
    Select Courier from Umbraco Content Tree

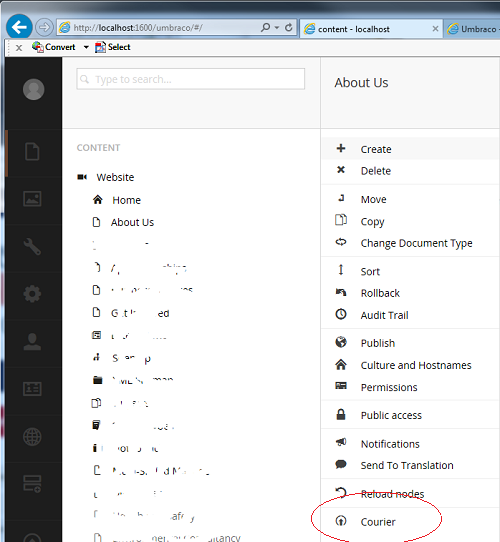
    You then choose “Courier” and the following page appears:

    Deploying from Content Tree
    Deploying from Content Tree

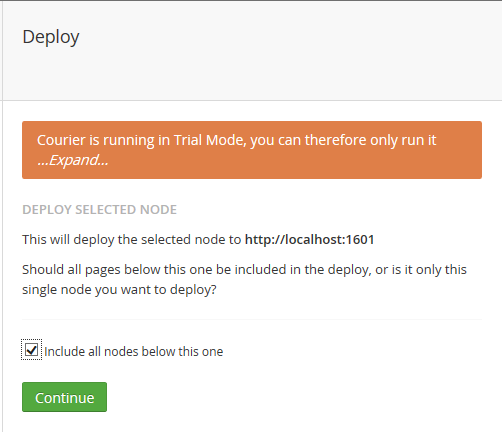
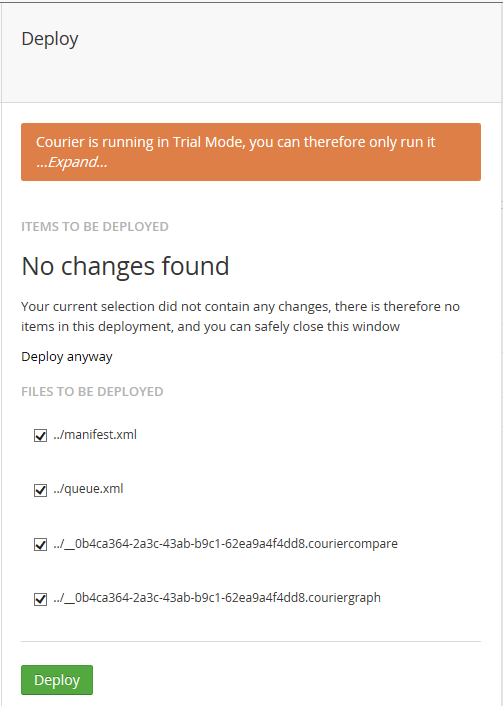
    After some thinking, the following page appears:

    Deploying from the Content Tree
    Deploying from the Content Tree

    Deployment from the Courier Menu

    This is more complicated. From what I can tell (there are no video or other links available to tell me exactly how this is supposed to work, even the link from the Courier dashboard gives a 404), this is how its supposed to work:1. You create a revision.

    Umbraco Courier Dashboard
    Umbraco Courier Dashboard

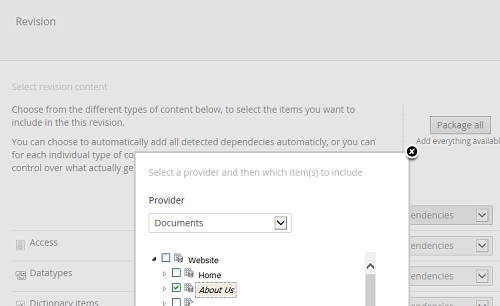
    2. When you create a revision, you have to specify what is in it. For us, choosing the appropriate Document content in the tree (or all documents) plus the correct level of dependancies was all that was required:

    Selecting Content in Revision
    Selecting Content in Revision

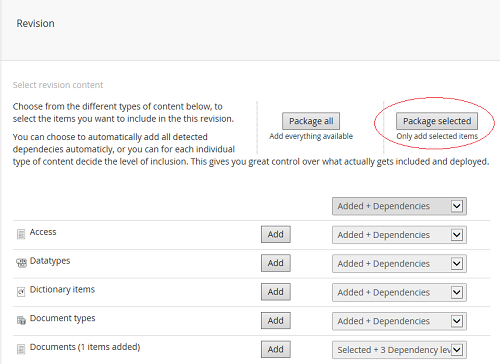
    3. This is the revision page before you press “Package Selected” to create the revision:

    Revision page before pressing "Package Selected"
    Revision page before pressing “Package Selected”

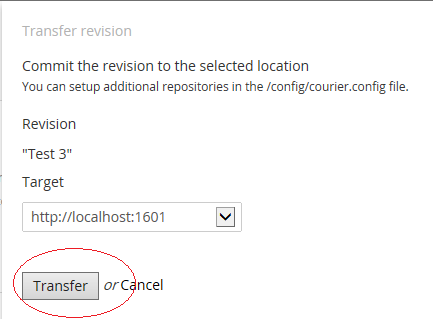
    4. Once it has been created you press Transfer to transfer it to the target machine:

    Transfer to Target Server
    Transfer to Target Server

    5. Enter the target server from the drop down and press “Transfer”:

    Press Transfer to copy to the Target Server
    Press Transfer to copy to the Target Server

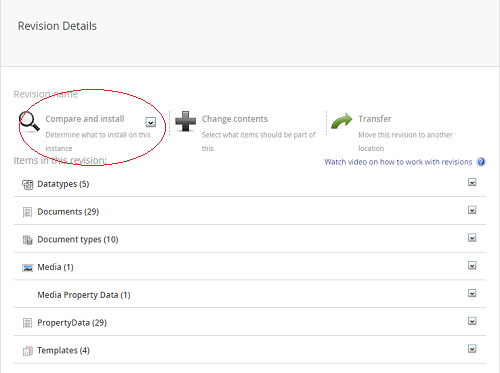
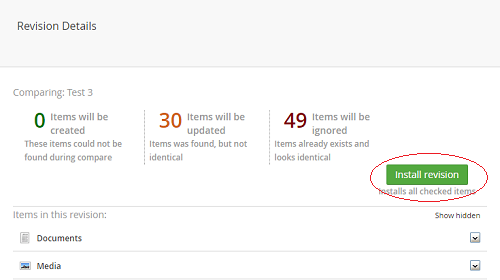
    6. Log into the target server and find the revision in the Courier dashboard (or press Reload nodes if you are already logged in). Click on that revision, then click “Compare and Install”:

    Installing on Target Server
    Installing on Target Server

    7. You then should press “Install Revision” to complete the process:

    Press Install Revision to complete
    Press Install Revision to complete

    Things to Watch out For

    1. Firstly, I was unhappy about the sheer number of missing links everywhere I looked and lack of information generally. This is quite an important component for Umbraco because unless you are deploying to Azure and setting up Azure Staging as described in the link, you need something like this to be able to view your test site before going live.
    2. Secondly, it uses webservice technology and I have read warnings that large files may not transfer correctly and cause the process to crash. What can you do about this? Ensure your upload sizes are big enough on both sites, and transfer large files manually. It appears the Umbraco developers don’t know about how to reliably transfer large files using WCF, either by streaming or chunking the file into 64k blocks.
    3. I think the second process could be a lot easier, I don’t think my users are going to use it, because we don’t really want them logging onto the live site and accidentally making changes that then get overwritten (or risk transferring the wrong way).
    4. There is also a risk that certain data may not transfer and developer customisation is required to ensure this. This could be quite complex, especially for my customer, as they are using the Umbraco Hybrid Framework. Hopefully because they are using this and deploying deeper objects via Visual Studio, it might not be a problem, we will have to wait and see.
    5. Oh and then don’t get me started on the difficulties of getting the licence to install…

    Maybe there is an opportunity for a product here that does a better job than this rather rough and ready product…

  • Additional Pages in an Umbraco 7 MVC Website

    Additional Pages in an Umbraco 7 MVC Website

    Umbraco 7 has messed around with, and closed down much of the MVC routing engine, to such a point that one cannot really be sure what standard MVC techniques still work.

    I have quickly come to the conclusion that while Umbraco makes very good CMS only sites this is a difficult area for a developer wishing to extend the site, say by putting additional pages in. All pages should be CMS pages and the components that the developer develops should be view based within them, or using the so called “Surface Controllers”.

    Is this a problem? I’m not sure right now for myself, and for the reader, it depends on your requirements. There may be times when you legitimately want to add some functionality outside of a CMS page. Your choices are very restricted as related – even examples that should work such as using Plugin Controllers, I can’t get to work – at best the website just hangs. Possibly because its passing some data around between pages and I’m not getting my routing code correct yet – I’ll update this post if I find out the answer.

    So if you want to mix CMS and your own pages, you must start with Umbraco pages and write your pages into the content, or choose another CMS.

    If you want additional pages in your site, then your choice is between making Umbraco pages and “programming” these, or putting your additional pages into a pure MVC project based sub-domain.

    Redirecting the odd .aspx page

    I have a small website that I wanted to perform some simple 301 redirects as it was replacing a webforms website.

    There are better ways of doing this (URL rewriting in the config file, or writing an handler for example), but what I ended up doing was creating a number of ASP.NET webpages of the same names as the old pages in the site, and having a Response.RedirectPermanent(“url”) in the Page_Load of the code behind.

    I also needed to alter the following Umbraco web.config AppSetting to get this to work:


    ...
    
  • Howto: Umbraco Visual Studio Install via Nuget

    Howto: Umbraco Visual Studio Install via Nuget

    As mentioned in a previous post, I have struggled to install Umbraco using 7.2.1/7.2.4 and Visual Studio 2013 (VS2013).

    As a developer my requirement is to add content management to an existing MVC project, or to start a new MVC project and give the users the option of content management so on the face of it Umbraco is a pretty good fit. Umbraco is more intrusive to Visual Studio than it could be in my opinion, because it overwrites the global.asax and uses its own compiled version for routing configuration etc. Not exactly an open system. However it does install correctly on VS2012. I have used MVC 4 and Visual Studio 2012 on .NET Framework 4.5.1.

    This is part of 2 posts, the second post covers Deploying a Visual Studio 2012 project to Azure – this are follow on steps once you have completed all the steps listed in this post.

    Here are the steps:

    Step 1: Create a C# or VB Web project in Visual Studio 2012.
    Screen print of Visual Studio New Project dialog
    Screen print of Visual Studio New Project dialog

    Choose your name and Click OK.

    Step 2: Choose Empty Project
    VS2012 - New ASP.NET MVC 4 Project options
    VS2012 – New ASP.NET MVC 4 Project options
    Step 3: Remove your global.asax and web.config

    I am not 100% convinced that this step is necessary, however I did it anyway during my install as some posts on the internet related to Visual Studio and Umbraco recommended it. Its probably a good idea to remove the files in the App_Start folder and also compile the project at this point (a better way if you have any concerns at this point is to go into Nuget and remove all packages).

    Step 4: Disable Resharper if you have it installed

    Again based on a recommendation I have read about. Go to Tools, then Options then Resharper as shown below:

    Resharper Options screen in Visual Studio
    Resharper Options screen in Visual Studio
    Step 5: Add Umbraco using Nuget Package Manager Console

    Go to Tools, then Package Manager, then Package Manager Console and enter the following command (N.B. omit the version part to get the latest version):

    
    install-package umbracocms -version 7.2.1
    

    Any errors at this stage – remove umbracocms and all other packages in Nuget and try again. Don’t forget to re-enable Resharper if you suspended it.

    Step 6: Create a SQL/Server Database

    You should create a SQL/Server database on your local machine:

    Creating a new database in SQL/Server 2012
    Creating a new database in SQL/Server 2012

    You also need to set up a user for this database:

    Creating a user in SQL/Server 2012
    Creating a user in SQL/Server 2012
    Setting up a user in SQL/Server 2012 step 3
    Setting up a user in SQL/Server 2012 step 3
    Step 7: Build and Run the Project to Install Umbraco

    Now you have set up Umbraco in the project, you need to set up Umbraco in its database for your website.

    Switch back to Visual Studio 2012 and Build and Run the project. If the following prompt comes up enter as desired (the publish option should transform debug out of the web.config in any case):

    Debug Question in VS2012
    Debug Question in VS2012

    Important: on the following page enter your details and click Customize. Do not click Install unless you want all the default options.

    Umbraco Installation Configuration Page 1
    Umbraco Installation Configuration Page 1

    On this page, you should enter the details of your SQL/Server database and user you just set up, then click Continue, to well, continue…

    Umbraco Installation Configuration Page 2
    Umbraco Installation Configuration Page 2

    You should choose “No thanks, I do not want to install a starter website”, unless you are doing this for the first time and want to have a play.

    Umbraco Installation Configuration Page 3
    Umbraco Installation Configuration Page 3

    Umbraco then “whirrs” for a bit (or maybe its just my computer) and then takes you into the Umbraco admin area. You are now ready to go and set up your own template. However, I’m going to take you straight into deploying this empty website to Azure in my next post.

    Umbraco Backoffice Admin Area
    Umbraco Backoffice Admin Area
    At this point, I think I checked the Add Item options in Visual Studio about 1,000 times, just to marvel at the “Add Controller” option, unable to believe my eyes. The reason? Following exactly the same steps in Visual Studio 2013 results in the scaffolding options being absent, with no way to get them back for that project. Not really good enough given that VS2013 has been around for a couple of years.

    To deploy this project to Azure, please refer to my next post on Deploying a Visual Studio 2012 website to Windows Azure. Having just created an Umbraco project, there are a few additional things you should be aware of:

    1. You need to ensure that all the correct files are included in the project, because by default, many are not. More or less everything apart from the usual bin, obj and packages folders should be deployed. So to do this, click Show All Files and right click and choose Include in Project as appropriate. If you don’t do this your project will not work when it publishes because it will not be complete.
    2. You should remove the umbraco\install folder within the solution. It is no longer needed and should not be deployed up to the web.
    3. You might like to add a robots.txt file before you deploy. There are many ways to do this, but I just added a text file to the Visual Studio project with some suitable lines in it.
    4. If you get errors when you deploy for the first time, you can use WebMatrix to change your deployed Web.Config to set CustomErrors=”Off” rather than “RemoteOnly”. This will allow you to see the YSOD (yellow screen of death). In my case, it was due to missing dlls – from an Umbraco package that I had installed as part of my theme. Visual Studio Publish doesn’t know about these. So I manually copied this DLL into my bin folder.
    5. Once you have deployed for the first time, its very important to ensure that any .config files in App_Data are NOT deployed subsequently. This is because these are data files that hold some of the content for the site. The reason why I deployed these the first time was because I had installed a theme locally before deploying so I wanted my sample content up. So I set build action to “None” for these files.

    Update: After following the steps in this post, you may like to review which files are in the project and also if they are added correctly to your source control system. I usually use SVN, and some work is always required in this respect. In particular Umbraco will not add files from a template into Visual Studio automatically, so you have to show all files and then include the files you would like in the project by right clicking and choosing “Include in Project”.

  • Umbraco VS2013 Nuget Install Problems

    Umbraco VS2013 Nuget Install Problems

    I have been working on my first Umbraco 7 project. No matter what I do I cannot get it to install correctly via Nuget with VS2013. I am tearing my hair out here, which is bad because I don’t have much to start with!

    The instructions are from our.umbraco.org, titled Installing Umbraco with Nuget.

    I have followed the instructions to the letter, including turning off my Resharper install. I have tried on two different machines, a Windows 7 with VS2013 professional and the same install on Windows 8.1.

    No matter what I do, I lose the Add Controllers and other scaffolding options at the point that the Umbraco install completes.

    I have tried installing an empty MVC project (which creates the menu options), then uninstalling MVC via Nuget, then installing via the instructions above, same result.

    If I follow the instructions above for VS2012 I get the correct scaffolding.

    I am using Umbraco 7.2.1, I have also tried 7.2.4.

    With VS2013 the end results are always as shown in the image below. The solution (ugh thats so 2012!) is to use VS2012!

    Image showing missing scaffolding in VS2013
    Umbraco install trashes VS2013 project
  • Uploading Zip files in Umbraco 7

    Uploading Zip files in Umbraco 7

    I have am in the process of setting up an Umbraco 7 website that has limited editing facilities (i.e. only one person will be updating the site, a relatively experienced user at that). I would like this user to be able to upload Zip files.

    It appears that the disallowedUploadFiles in config/umbracoSettings.config is totally ignored:

    
     ashx,aspx,ascx,config,cshtml,vbhtml,asmx,air,axd,swf,xml,html,htm,svg,php,htaccess
    

    Instead, it uses jQuery to upload the files, and the jQuery uploader has its own list of allowed files. I looked inside umbraco_client\FileUploader\Js\jquery.fileUploader.js and altered the following:

    
    (function ($, window, document, undefined) {
    
        $.event.props.push('dataTransfer');
    
        var defaultOptions = {
            autoUpload: false,
            limit: false,
            allowedExtension: 'jpg|jpeg|gif|png|pdf', // alter this line to include your file types
            dropTarget: null,
    ...


    I don't recommend expanding this to Exe's or Zips if your users are not 100% expert and totally trusted not to upload bad files. I wanted just to be able to upload Zip files.

    Next, I had to look at the file size limits. ASP.NET's defaults are too low. To fix this, I edited web.config, to add the maxRequestLength and executionTimeout attributes:


    ...
    

    I also had to add a System.WebServer.Security section to the web.config:


    ...
    

    This allowed my uploads to work ok.

    The alternative to doing this I guess (I didn't try it) was to upload small text files as place holders and then log into the server and change the files - which are placed inside the media folder under a subfolder which is the Id of the media item.

    Thanks to Scott Leslie's post that I found that reminded me of what needs doing to set the file upload limits in web.config http://sleslie.me/2014/change-maximum-upload-file-size-in-umbraco/